I bought this classic pedal for less than $30. I did not expect stellar sounds, but it delivered. What it delivered was a harsh, bright distortion with lots of gain. I’ve read stories about the Seeing Eye modification from the great Robert Keeley himself. I decided to give it a shot.
The Beginning
To be perfectly honest, I bought this pedal with the intention to modify it. I’ve read that it does not sound great on it’s own… and it does not. It is really bright and sterile and that in hands of less capable guitarist (as myself) can lead to creating a really nasty tone reminiscing of beginner rockers mercilessly “slaying” some G’n’R or Metallica riffs. Now usually I would rather avoid such effect, but I heard some stories, almost from the realm of fables. They said, that you could change this cheap pedal into on that sounds like… one that is not so cheap, I suppose? With asymmetric clipping, a little more tamed tone and less gain for more responsiveness this seemed almost too good to be true. Well, here I was one evening, with the pedal on my desk, about to check if these tales were to be put between other children stories.
 before modification")


The Journey
I will not explain all steps necessary to perform the modification I did, as there are reasonably many how-to’s on the net. I will however share my general thoughts on the process:
- The fact, that you have to unsolder the wires connected to the switch to have reasonable moving area was quite surprising.
- The amount of fidgeting with those little boards soldered onto the potentiometers and power LED required to insert them into place for assembly was too much for preferences. The amount of coffee I drank before sitting to the desk was a factor in my annoyance as well, I suppose.
- Even after a year of working with them, I still cannot seem to remember the LED polarity. To make things worse, I am too eager to screw everything together too soon. This of course led to more fun time with a screwdriver.
- The fact, that you cannot turn a Boss pedal on with no input jack inserted gave me a fright not once, but twice on the same night.
Other than that, it was really quite simple. Just a handful of capacitors and resistors to replace, a new LED for the power light, reusing the old one for the asymmetric clipping and it was done. To be honest, I really like the finished effect. Because the clipping LED is visible, it makes for a very pleasing indicator of how hard are you pushing the circuit and the positioning is almost as it was planned to be there from the start! But, of course, the looks are only second. I could not wait to test it out.
The Destination
Now for the most important part: the soundbites. I was sensible enough to prepare clips of the sound made by the pedal before modifications, so that you can compare the same riffs and the same settings.
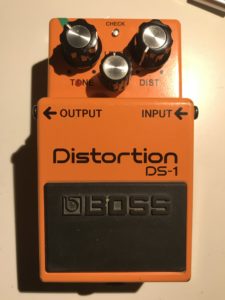
As for the equipment and settings used for the recording, check the aptly named Equipment & Settings section below. I used the same “tone” knob setting for all clips – about 11 o’clock gave a nice, thick sound without being too bright. You can see the marking tape on the photos. The “level” knob was set to 12 o’clock (just over unity gain, according to my ear). I set the “dist” knob to various positions to show the pedal from the mildly distorted sound of 0% to the extremely harsh and compressed 100%.
I prepared a rock-ish riff on the neck pickup, a more melodic riff on the middle pickup, a quasi-solo lick for the bridge humbucker and, just for the kicks, two riffs from “Funk #49” by The James Gang. Don’t ask me why this particular song popped into my mind whilst recording. For thoroughness, a clean version of all riffs is also included. Please mind, that I am no guitarist.
Clean Riffs
Before mod – Stock DS-1
After modification
Best soundbits (IMO)
Equipment & Settings
Guitar:
Washburn Chicago Series
Pickups:
two Fender Standard singles
Seymour Duncan JB SH-4 humbucker
Amp: Kustom Tube 12A tube amp
Audio interface: Behringer U-Phoria UMC404HD
Guitar settings:
volume knob 95%, tone knob 80%
Amp settings:
Clean channel, no mid scoop
Low: 10 o’clock, High: 2 o’clock, Volume: 11 o’clock
The Result
Well, I really would like to not share my own opinions about the modifications, as I would prefer you, the listener, to pass your own judgement. Is it worth it? How much (or how little) did the tone and quality change? Should you perform a similar procedure with your DS-1? Listen and answer for yourself.
Still waiting for my words? Oh well, if you insist… Be aware, that these are my opinions.
I happen to find the new sound a bit thicker in the lower end. As such, it is much easier for the ears, even when the “Dist” knob is cranked higher than 50%. The distortion is more responsive to attack and could almost pass as an overdrive on the 0% setting. Overall, the “sonic palette” available to the user expanded ever so slightly. Still, the most extreme settings (“Tone” or “Dist” maxed out) are just that – extreme. For me, rather unusable in normal circumstances. This is nothing unexpected, really, and does not affect the whole opinion.
All in all – the change is noticeable, but not drastic, most definitely for the better. Remember, this is still a pretty basic distortion pedal, but it now has at least some kind of character over the almost synthetic distortion of the basic version!